

Frequently asked questions
Need help with My IT? Take a look at the frequently asked questions below. If you don’t find what you need, contact your dedicated support team or call the Service Desk on 0800 482 290.
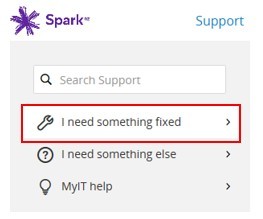
How do I log an Incident/Fault?
An Incident is an unplanned interruption to an IT service or a reduction in the quality of an IT service. Incidents are logged under “I need something fixed”
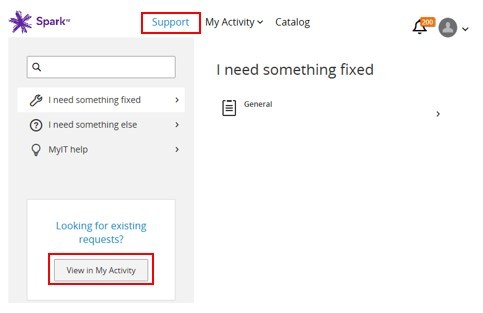
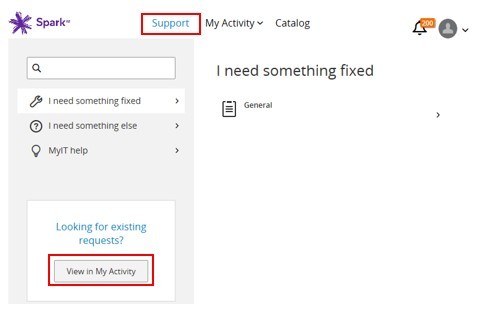
Step 1: Go to myit.spark.co.nz and Click on the “Support” tab.

Step 2: Select “I need something fixed”.
Step 3: From the drop down list select the appropriate option that describes your issue.
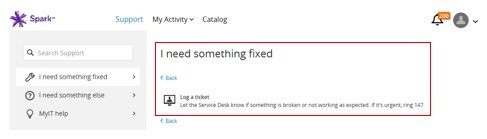
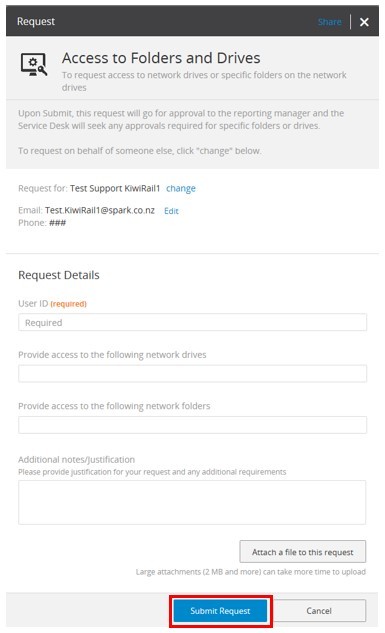
Step 4: You will be prompted to fill out a form. Enter all the relevant details and click “Submit”.
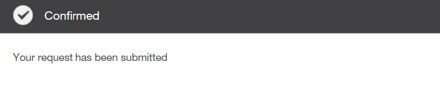
Step 5: You will get a confirmation that your Incident has been submitted.
Step 6: A reference number will have been created automatically. Click on the My Activity tab to view the request(s).

How do I log a Service Request?
A Service Request is where a user requests information or advice, a standard change or access to an IT service. An example of a standard request is ‘Access to Folders and Drives’. Service requests are logged under “I need something else”.
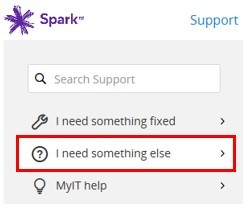
Step 1: Go to myit.spark.co.nz and Click on the “Support” tab.
Step 2: Select “I need something else”
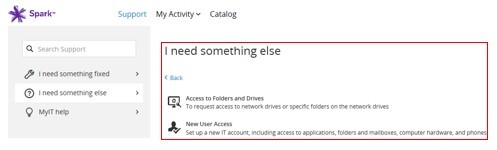
Step 3: From the drop down list select the appropriate option that describes your Request.
Step 4: You will be prompted to fill out a form. Enter all the relevant details and click “Submit”.

Step 5: You will get a confirmation that your Request has been submitted.

Step 6: A reference number will have been created automatically. Click on the My Activity tab to view the request(s).
How do I view the status of my ticket/job?
There are two ways to view the status of your ticket from the main page of My IT.
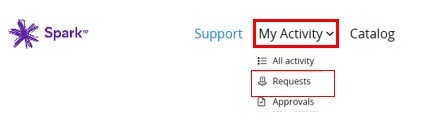
Step 1: Go to myit.spark.co.nz and Click on “View in My Activity” OR click on the “My Activity” tab.

Step 2: You will get a list of tickets/ jobs.
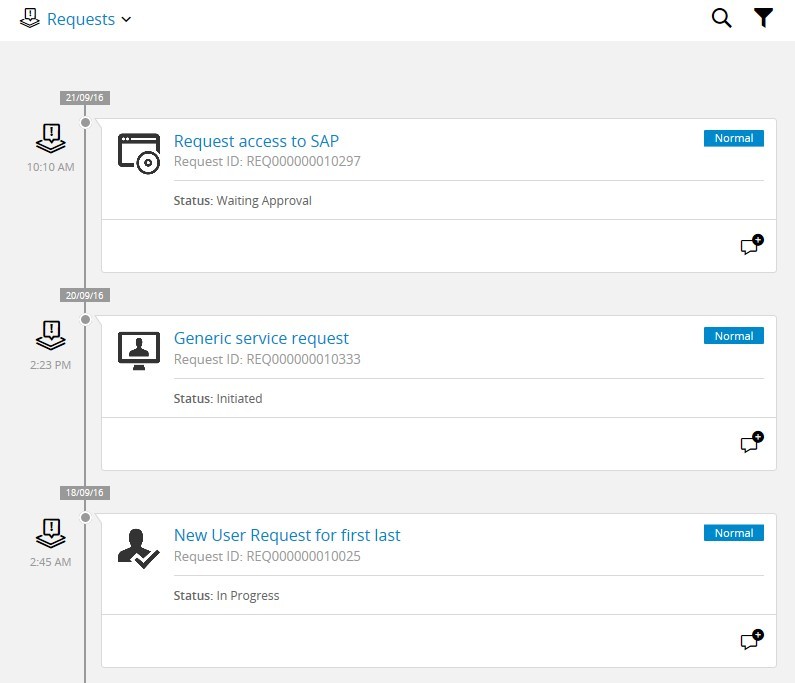
Step 3: Customise your search by clicking on the filter button on the top right. This will automatically refresh your search.
Step 4: Click on the request you want to view. In the example below:
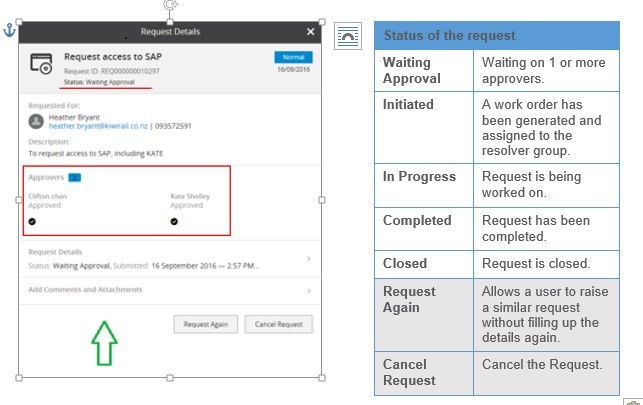
If you want to update your ticket for any reason, you can add a comment or attachment here.
This will update the Remedy Work Order automatically.
How to approve/reject Service Requests and changes
Managers / users
who are set up as approvers can approve, reject or hold requests and
changes raised in My IT. If you are one of the approvers then you can
approve / reject service requests and changes, using multiple options.
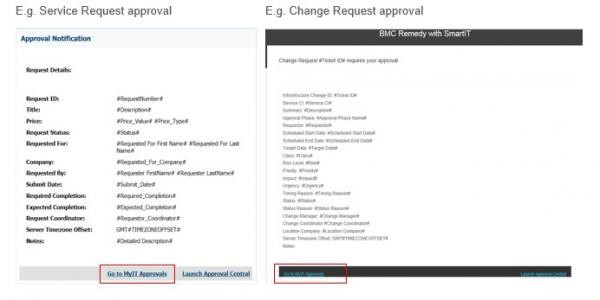
Approval notification received via email
Option 1
Users Manager will receive an approval email for Service Requests as well as Changes awaiting approval.
Step1: Click on the “Go to My IT Approval” link.
Step 2: Login to My IT
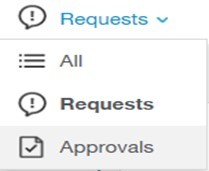
Step 3: Click on the My Activity drop down list and select “Approvals”.

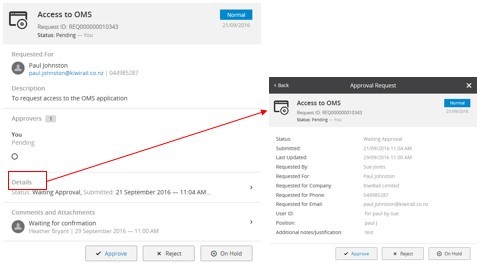
Step 4: From the drop down list select the request and click on “Details” to view the Request details.
Step 5: Choose to approve, reject or hold.
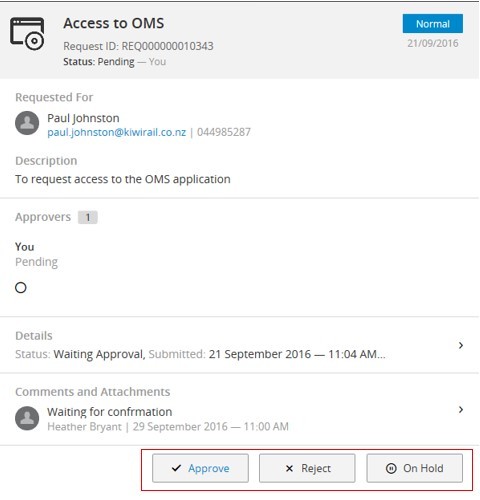
Note1: The approver can add comments if required by selecting the icon before
approving the request. The default functionality does not trigger this
automatically.
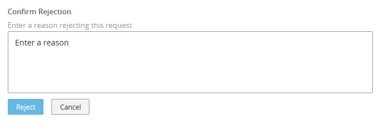
Note2: When the approver selects the ‘Reject’ option, a new screen is displayed where
the approver is expected to enter the reason for rejection.
Option 2
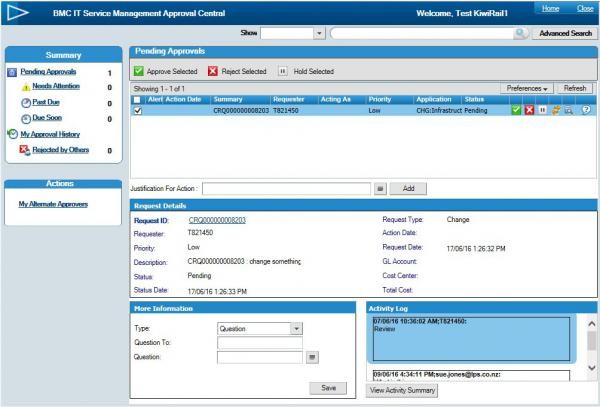
Step1: Click on the “Launch Approval Central” link
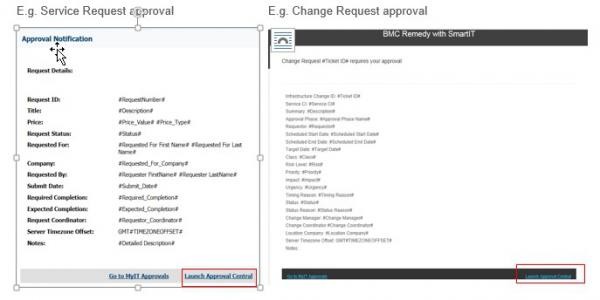
Step 2: Log in to BMC Remedy

Step 3: Choose to approve, reject or hold
Approval via My IT
Option 1
Step 1: Go to myit.spark.co.nz and Click on “View in My Activity” OR click on the notifications Icon (bell shape) on the top right

Step 2: Customise your search by clicking on the filter button on the top right. This will automatically refresh your search.
Step 3: From the drop down list select the request and Click on “Details” to view the Request details.

Step 4: Choose to approve, reject or hold.

Note1: The approver can add comments if required by selecting the icon before
approving the request. The default functionality does not trigger this
automatically.
Note2: When the approver selects the ‘Reject’ option, a new screen is displayed where
the approver is expected to enter the reason for rejection.

Option 2
Step 1: Go to myit.spark.co.nz and Click on “View in My Activity”.
Step 2: Click on the drop down list and select Approvals.
Step 3: From the drop down list select the request and Click on “Details” to view the Request details.
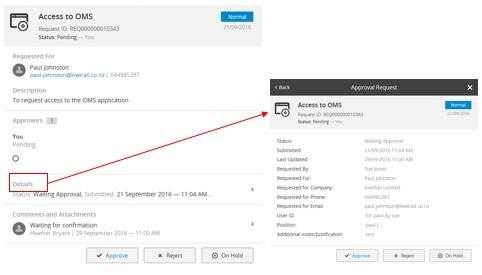
Step 4: Choose to approve, reject or hold as above.
Note1: The approver can add comments if required by selecting the icon before
approving the request. The default functionality does not trigger this automatically.
Note2: When the approver selects the ‘Reject’ option, a new screen is displayed where
the approver is expected to enter the reason for rejection.

How to search for Knowledge Articles
You can search for Knowledge articles and solve some problems yourself before filing an
incident or talking to support staff. These articles can be accessed through the search function under the Catalog tab.
Step 1: Go to myit.spark.co.nz and Click on the Catalog tab.

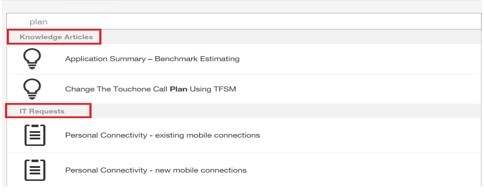
Step 2: Type a key word for your fault / error.
For example: If you want to look for articles related to “Call Plan”, just type in “Plan” and you will get the results for Knowledge Articles as well as Service Requests.
Step 3: Click on the Knowledge Article that best describes your issue to see more details.
Appendix
There are certain MyIT functionalities that are to be taken into consideration while logging a service request or viewing your activity or approving/rejecting a request.
Log a service request
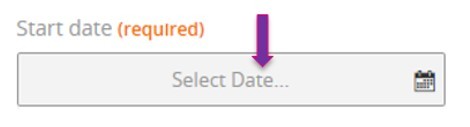
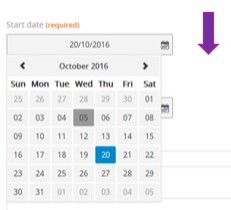
Using Calendar for selecting a date:
- Please click in the middle of the date field to select the required date. Clicking on the ‘Calendar’ icon (on far right) will not display the date.
- Once the date is selected, to exit the calendar, click outside the calendar as there are no options of ‘Done’ or ‘Close’ to exit the calendar.
My Activity
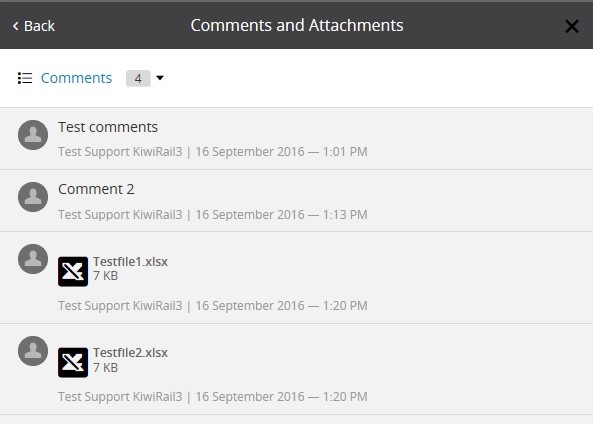
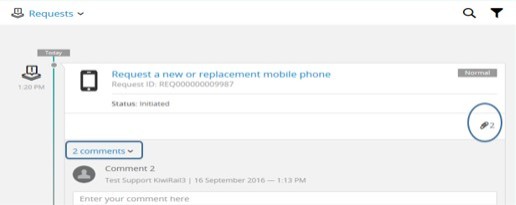
My Activity displays only the latest attachment or comments for a request. To view all items that are associated with the request:
- Click on the request name to view the request details screen
- Select the ‘>’ icon within the ‘Comments and Attachments’ field
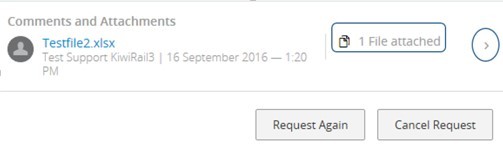
Note: Though the request has two attachments and two comments, as My Activity view only displays the latest attachment or comment, the request details indicates that there is only ‘1 File attached’ as per the above screen shot. The activity queue displays the number of attachments or comments correctly as shown below.

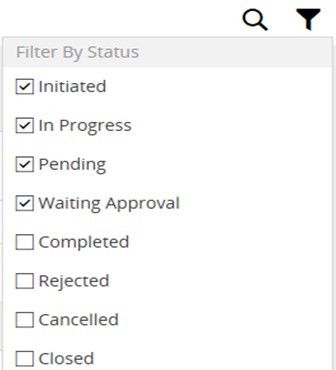
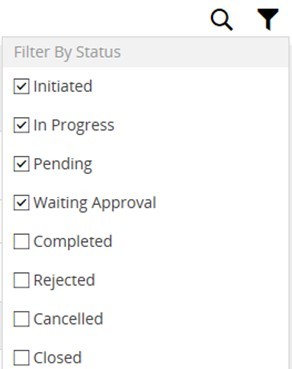
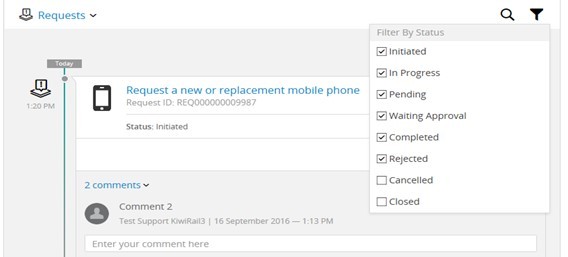
The default view of My Activity displays all ‘Open’ requests which have the status of ‘Initiated’, ‘In Progress’, ‘Pending’ or ‘Waiting Approval’. In order to view all other requests like Approved or Rejected:
- Click on the filter
- Check the required status options. This change is only applicable to current session and when user logs in next time, it resets to the default setting of open requests.
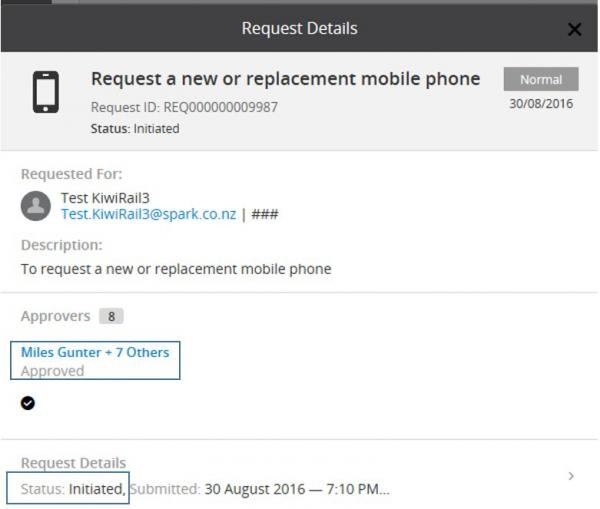
- Those requests that have been approved by resolver groups are displayed with a status ‘Initiated’ in MyIT. They ae not shown as ‘approved’ as MyIT uses service request forms and Remedy uses work order or incident
forms.
- Click on request name
- ‘Request Details’ screen displays that the request has been approved and the status is ‘Initiated’
Notifications
Once the request is submitted by the user, the approvers get notified through an email and they can also view the notifications in MyIT.There is a minimal
time lag (app. 3mins) between the request submission and the notification appearing in MyIT.
Managing passwords
If the web browser is to remember or save user passwords when logging into MyIT, its settings require updated.
- Managing passwords in Internet Explorer
Password saving is on by default in Internet Explorer. To turn on or off:
- In Internet Explorer, select the Tools button, and then select Internet options.
- On the Content tab, under AutoComplete, select Settings.
- Select the User names and passwords on forms check box, and then select OK.
To turn off password saving, clear the User names and passwords on forms check box.
- Managing passwords in Chrome
- Open your Chrome browser and from the top right Chrome menu button, select Settings.
Alternatively, you can simply type chrome: //settings in the address bar and hit Enter. - Scroll down and click on Show advanced settings. Now scroll down to the Passwords and forms section and click on the Manage passwords link.
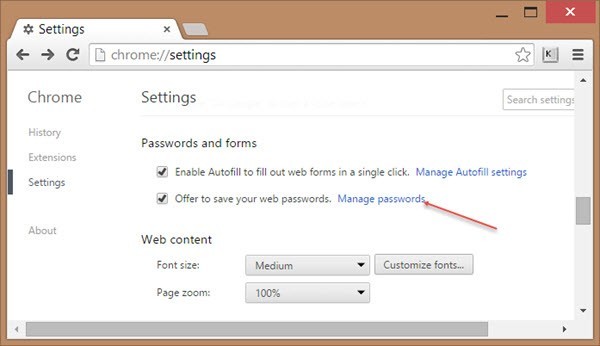
3. You will a list of all your saved passwords. The passwords will be hidden by asterisk marks. To see them, click on the Show link.
- Managing passwords in Firefox
Password Manager Settings
Firefox will remember passwords by default. You may have disabled this feature, or told Firefox to never remember passwords for a particular site.
- Click the menu button and choose Options.
- Select the Security panel.
- If it isn't already check marked, check Remember passwords for sites.
- To the right of Remember passwords for sites, click the Exceptions… button.
- Make sure that the site you're trying to log in to isn't shown in the list. If it is, select the entry and click Remove.
- Close the about: preferences page. Any changes you've made will automatically be save
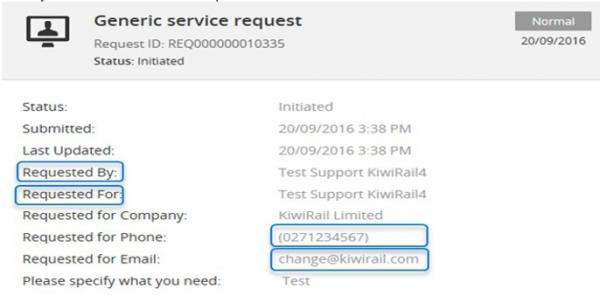
Request by/Requested for details or updates to requestor contact details
When logging a request, if the contact details of the requestor are updated from the default details, this is reflected in the request as well as the work
order. The same applies when requesting on behalf of another user.
- Display of ‘Updated’ contacted details
- User logged in as Test Support KiwiRail4 and default details in request are
2. Requestor contact details updated and request submitted

Request details view shows the updated contact details
Work order view
Customer*+: Moving the cursor on the search icon displays the updated contact details for the requestor.
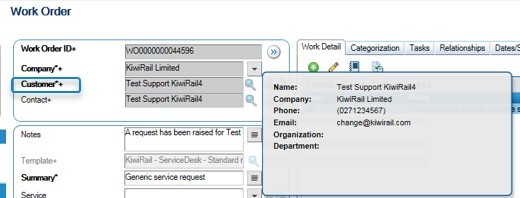
Contact+: Moving the cursor on the search icon displays the default contact details for the requestor.

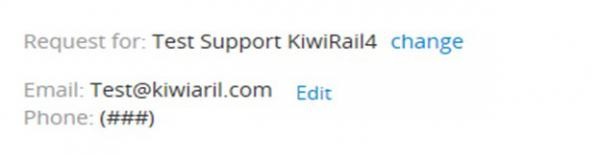
- Display of ‘Requested For’ details
- User logged in as Test Support KiwiRail4 and default details in request are:

2. Requestor for updated and request submitted

Request details view shows the ‘Requested For’ name different to ‘Requested By’ name
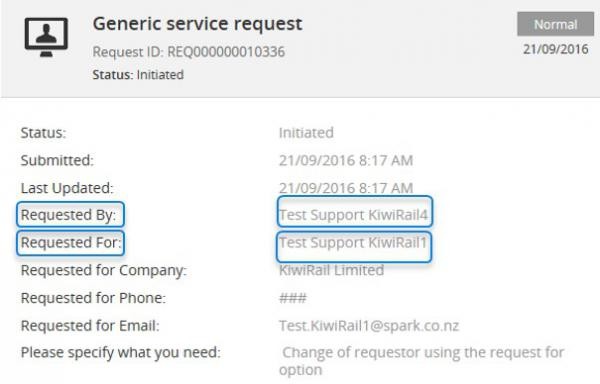
Work order view
Customer*+: Moving the cursor on the search icon displays the ‘Requested For’ details.

Contact+: Moving the cursor on the search icon displays the ‘Requested By’ details

Search Functionality- Stop words
Stop words are words that appear so frequently in documents and on web pages that search engines would often ignore them when indexing the words on pages. These could be words like: a, and, is, on, of, or, the, was, with.
MyIT uses the google stop words for English, German and Swedish and the relevant link is as below:
https://sites.google.com/site/kevinbouge/stopwords-lists
Cancellation process:
If a request or work order is required to be cancelled for any reason, the resolver group/ assignee should change the status to ‘Pending’, contact the approver for confirmation before changing the status to ‘Cancel’.
Note: Once the requests is cancelled, it cannot be re-opened for re-submission.